When I worked on the VR team at Shopify my entire life was something of a hectic barrage of new things to learn as quickly as humanly possible. One of those things (improbably) ended up being sound design. A little over a year has passed since I found myself trolling the internet for even the first breadcrumb to get myself going, and since I had such a hard time finding it I thought instead I would bake write it myself.
So, let's talk about the happy accident that became my first sound credit: frantically trying to put together a beautiful soundscape for Thread Studio less than a month before launch. While I don't necessarily think the results of my first project are a work of art, at least when you drop a mug on the floor it more or less sounds like a mug falling on the floor, and I'm calling that a victory.
If the above self-deprecation doesn't make this obvious, I'm not an audio expert, and I have no professional audio training at all -- I came to this from something approaching zero[1]. I've written this piece from the perspective of a software developer more familiar with the game engine side of the equation. After all, I've been known to mute games to play my own terrible music in the background because I don't care what your training is if you've hit a boss or level more than three times it is proven fact that the only way to beat it is bad punk music[2] and bad whiskey.
Everything from DAWs to interfaces, envelopes to sound cues were completely new to me. So I'm writing this after my personal baptism by fire. I'll be covering some quick basics, implementing sound cues in the Unreal Engine, simple mixing in Reaper, and finally touch on recording things yourself. At the end of what was supposed to be a series but is now just a gigantic wall of text you should be able to get a reasonable sound environment going on in Unreal.
Though my experience is on VR projects, I've decided to not go into detail on the specific intricacies of audio in virtual reality. This post is already over five thousand words and you must learn to crawl before you can walk, walk before you can run, and run before you can VR. I hope to eventually write about the specifics of 3D audio, but expert sound designers looking for virtual reality specific information will definitely be disappointed.
If you want to jump to a particular section you can hop to Unreal, Software, or Hardware.
Let's get started.
Basics
To start this post as one starts a university paper hacked out the night before: "what is sound?" Sound is vibrations moving through the air, that your ears pick up, and your brain processes. Pitch, volume, and delay are the main factors that allow differentiation of one sound from another, and determine its location in space. To build up a compelling scene in VR using sound you need to be aware of all of these factors as well as how they influence what you think you're hearing and where you think it is coming from.
While there is obviously some overlap when translating air vibrations into ones and zeros in this series we'll be focusing on Foley (sound effects). Music is still way outside my orbit, possibly because art is involved. Even more narrowly the example I'll generally be using is the sound something makes when it collides with something else[3] like a floor, or a person.
I'd say the most important thing to keep in mind at the beginning of your first sound project is that it is more critical that your effects sound correct than accurate. You can have the clearest and most beautiful recording of something in all the land but if it doesn't sound the way people expect it to sound it's going to be weird. The best illustration of this to me is a gunshot sound. If you record an actual gun at the proper volume it's loud enough that it will ruin the hearing of your entire audience, but efforts to prevent the aforementioned mass deafening can make it instead sound like an anaemic firecracker. Thanks to movies ruining everything people expect a gunshot to sound bombastic, and so we cheat. A popping plastic bag is more in line with what people expect a movie gun to sound like, apparently, so that is nearly always the sound you want to go with.
Another big hot tip I picked up along the way here is to actually listen to things. Which reads like a copout but that's been the biggest shift for me. I notice the air conditioner (sadly), and how the kettle sounds, for better or for worse, I consider how they would sound different in different spaces, and how they could be mistaken or manipulated to sound like other things. I especially pay attention to volume, which is to say I pay attention to the tinnitus I have inadvertently given myself going from listening to quiet pen scratches, to the opening for Pink Floyd's "Time" at top volume because I swapped contexts without thinking to turn my audio output volume down.
Unreal Engine
To put together the most rudimentary audio design for an Unreal project all you really need is a library of useful sounds. We'll later get in to how you can make them yourself, but to start you don't need hardware or additional software. In fact, it's probably better to start by acquiring sounds because generally they are recorded by professionals with useful things like expensive equipment, and training. Make sure you double check the licenses of downloaded files to ensure you are using them legally. I am not responsible if the long arm of the law catches up with you.
The prerequisite for this section is at least a general knowledge of the Unreal editor because this post is long enough without increasing the scope. If you need some help getting started Epic has put together some helpful tutorials.
We'll start by bringing an audio clip into Unreal.
When importing a clip, the first thing to ensure is that it is in the proper format. Unreal is fairly picky about what it will consider an audio clip. Specifically, the clip must be a 16 bit PCM WAV[4], attempting to import other file types such as MP3s will lead to Unreal telling you that it cannot create an asset and will fail to import. If you are planning on using the imported clip for positional audio (sound effects that emanate from particular place in the world) you will also need WAVs to be mono (or single channel). You cannot use stereo clips for positional audio because a stereo recording uses volume and other tricks to make the clip sound like it is coming from a particular place, the engine handles those calculations in game so the player can move around the space and not have contradictory cues as to where a sound is coming from.
Alright, we have some WAV files, we have an engine, we have some whiskey. Let's fucking party.
The very first thing that you're going to want to do is import those audio clips into Unreal. The most expedient way to do that is to click and drag them from wherever they are on your hard drive into the Unreal project explorer. At Shopify we were using the Unreal Engine Style Guide and so all audio clips imported would have their names prepended with A_ and given a descriptive name. You don't need to follow the style guide and you can call all your clips tim1, tim2, tim3 for all I care, but organization will help keep your ducks in a row. Especially helpful if there are many ducks.
You can technically just plug these audio clips into your game now but that would be an incredibly silly way to go about that. I work under the assumption that we are being very serious here and have left all silliness at home so let's do it better.
The real bread and butter of audio work in Unreal is the Sound Cue and any place you would drop a WAV file you can use a cue instead. The sound cue in Unreal is remarkably similar to a Blueprint graph, only it is used to manipulate sounds and not game states. You can think of a cue like an oven: you know what you have to put in (dough), and you know you expect to get delicious bread out but the way the oven turns the cue into bread is a mixed metaphor not important as long as you get the right thing out. Inside a cue you can apply different effects to WAVs , and even swap them out without having to dig through the Blueprints every time things don't sound right. You can even have more than one WAV in a cue as long as things filter down to a single output sound. Once you have a cue set up if you press the 'squeeze rubber ducky' button you can expect to get out some kind of rubber ducky noise.
This especially helps because in game audio you rarely want to play the exact same sound over and over again. If a player can trigger audio once by performing a particular action it's usually easy enough to perform that action ad nauseum. Sometimes you may even be required to do that action multiple times, like opening a door. This is where cues start to become magic. You can use the graphs in cues to play various different randomly selected WAV files, and you can even modify the pitch and volume to add even more variation. You don't need to add more complex spaghetti spider webs to your presumably already spaghetti spider infested Blueprints[5] just to keep sounds from getting annoying -- it can all be abstracted away with the cue.
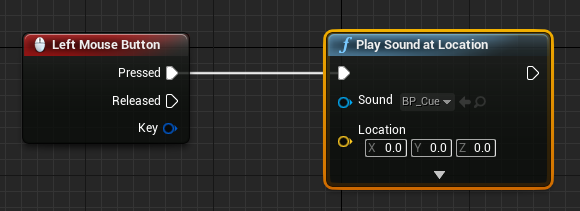
After you have created a cue you can start plugging them in to Blueprints. The most simple way to do this is to use a 'Play Sound at Location' node, select your cue from the dropdown in the node and when the node is hit it will play the sound exactly once. Easy.
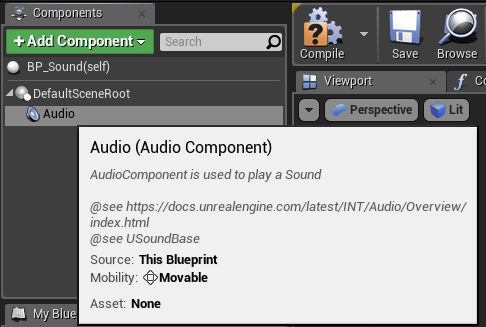
Unreal also has an Audio Component that can be added to any Actor. This component can be added in the actor hierarchy and triggered in the Blueprint with a 'Play' node, or you can use the 'Spawn Sound at Location' node which lets you build an audio component from a cue on the fly. 'Spawn Sound at Location' lets you modify the sound of the cue after it is triggered. Attaching cues to actors is the foundation of positional audio an actor knows where it is in a scene and can play a sound from there.
Cues can also be added to the level to add background music, or ambiences. In traditional games this is probably the main place you would want to use stereo sounds but if you're working in VR it is especially important to never use stereo anywhere. Stereo tracks always provide some level of positional information and because you occupy space in VR it is jarring for your eyes and ears to not have matching information. If you move, you expect the sound to change in subtly different ways this isn't possible to do properly with stereo sounds.
On that note I want to ever so briefly mention Attenuation, or using volume and pitch in one or both ears to make a cue sound like it is coming from a particular place in a level. Getting attenuation right (especially in VR) is extremely important, and unfortunately a very deep and sprawling topic that I don't have space to describe at length[6]. For your first VR project though there are some sensible defaults that you can generally get from using either the Oculus HRFT plugin[7] which works on all major VR platforms and has a pretty good out of the box natural sounding attenuation. Attenuations work like most other objects in Unreal and can be applied to multiple sound cues.
So, armed with a few downloaded tracks you should be able to get started with the most basic audio tools in Unreal. Unreal has a plethora of other tools for sound design like Concurrencies, Sound Mixes, and Sound Classes and a brand new audio engine is being added in the next few releases which will give you more tools, but to get started you should now know enough to be dangerous.
If you're finding there is stuff you want to get done but Unreal doesn't seem to have the power we can go down a level and look at modifying sounds before importing them using REAPER, a digital audio workstation. Onwards!
Software
In my salad days of audio design (approximately 6 months ago) I wasn't really doing anything more complicated than downloading audio clips and dropping them summarily into Unreal. Most of the sounds I was in need of were the easily found 'mug hitting a floor' and 'cat meowing' genre. The only actual editing I needed to do was make stereo files I had found into mono files by downmixing them, and make sure they were in the format that wouldn't make Unreal puke on my shoes.
To do this I used the eternally recommended Audacity. Audacity isn't exactly the most powerful piece of software, and suffers the same UX problem as the GIMP, which is to say it unfortunately was designed by programmers. But it's free, open source, and can get a whole host of jobs done though often in a way that is clunky and unintuitive. For example in most DAWs[8] to move an audio clip from one track to another (a very common operation) you click and drag the audio clip down a track. I'm still not 100% sure how to do this in Audacity. That said, Audacity is lauded across the internet for being sufficient in many use cases so it may be a good place to get your feet wet.
For our next (internal) trick project our requirements were a bit more sci fi and my searches for the specific sounds in my head were proving somewhat more fruitless, so I needed to move into editing the sounds that I could find to fit more comfortably into the environment the art team had built. Beyond this my tastes were refining, there was more I wanted to be able to do -- I was riding high and starting to feel like I was making progress and thus ready to get pounded into the dirt again. It was time to get fancy, and look into what is called a DAW.
A DAW or Digital Audio Workstation is your core audio mixing software -- "mixing" being the proper term for modifying audio tracks. Mixing produces mixes, surprisingly enough[9]. The general workflow in a DAW involves taking the audio clips that you have and positioning them along tracks (the areas that look like a timeline) and then combining these tracks with each other in something like layers. You can add special effects to tracks, or chance the pitch, volume, and delay of them independently, remove noise in the background, or add filters to make any number of tweaks. After you have played around with these variables you can say that you you did it, you mixed a thing.
If your first DAW experience is anything like mine you'll read a bit, find that all the real audio people use one called ProTools and after choking on your tea on seeing the price of the full version try downloading the free training wheels version ProTools First. To accomplish this feat you will need to make two accounts and install so many installers and updaters that months later you'll still be purging. You'll finally open it up, thinking you're ready, then immediately close it because you definitely aren't. You never were.
So you'll probably loop back to the internet to see if there is a DAW that makes more sense. There isn't. You'll despair.
A DAW is a harrowingly complex piece of software, it is Photoshop, it is Visual Studio. With great power comes a great number of menu options whose purpose you don't understand. Suffice to say they all seem complicated in different ways.
So, I did what any software developer would do in my situation[10] : I got stuck in a tools optimization vortex, where nothing seemed like the right way to do something, but none of it seemed especially wrong either. I needed to make an educated leap of faith, and the trampoline on the bottom ended up being REAPER.
REAPER hits a bunch of the right spots for a beginner -- the community is very active and while it isn't free there is an unlimited free trial and licenses are an absolute steal starting at $60 for individuals, and 225 for businesses. It has enough resources to make it fairly easy to learn but it's powerful enough if you go pro.
The real highlight of REAPER for someone in my position is the ridiculous quantity, and quality of the tutorial videos accessible to even the most junior of newbies. If you've never touched a DAW before, and you have no idea what is happening you'll get a very clear introduction, in what is likely hundreds of hours of mostly purpose agnostic videos. They'll show you a dozen ways to do everything you ever could have wanted and the efficient keyboard shortcuts with which to do them. You'll be able to impress on looking coworkers with ease as you consistently hit the wrong buttons because you always do when people watch you type.
The major downside of REAPER is putting it in as a search term is basically guaranteed to have a whole pile of noise (ha!) meaning you'll have to sift through the grims and the mechanicals, as well as every edgy video game character ever if you need to go past the official tutorials.
So, you've picked some software, blitzed through a bunch of tutorial videos and want to start organizing a game project. Most of the guides I had found for this were focused on songwriting so, for better or worse, this is what I do to get my effects sorted out.
First I draw up a document, or cue sheet to keep track of exactly what sounds I need for in a given project, then a create a big folder on my hard drive named after the Unreal, or Unity project itself. I then make a separate REAPER project for each item on my sheet. All of the mug clips live in a different project than the hat falling clips. It means there are a lot of REAPER projects for a single game project but you'll only be including the rendered (exported) WAVs so if you have the hard drive space this will keep all the pieces in their own place.
This system is especially useful for sounds that need variation. Each clip variant can live on its own track, and you can listen to them side by side to make sure they match and are consistent without sounding identical, and you can export them all at the same time. You can tweak and remove clips that aren't right easily.
Once each soloed track sounds okay in REAPER you can export each track individually into the 16bit PCM WAVs by rendering the stems in the render menu and Bob's your uncle[11]. You can import them into Unreal, and start plugging them into audio cues and jump back up to the previous section of this post.
So, now we know how to get our clips into Unreal, and how to customize our clips before we do. Let's get into how to record our own clips.
Hardware
So, we've taken sounds on the internet dropped them into Unreal, and we've modified some of those sounds to better fit into our project. Our final step is to record some of those sounds ourselves. This part is still very new, even for me, so I'll be doing my best to at least give a decent jumping off point that I hope will help people who are coming from absolute zero like I was.
As you build up you project you will eventually notice that there are some songs for your project that you just cannot seem to find. Either because no one seems to have recorded them yet or the only way you can think to describe them is "mrrrraaaaagghhggaaaaapppp" and apparently that's not a particularly effective search term. You might be at a place where you know you can make the sound yourself if only there was a device out there that would let you record it.
For the most simple, Audacity tier recording many of your early sounds can be sufficiently recorded with something like a Snowball USB microphone. It might not be the sort of recording that is winning you any kind of award, but it's also highly unlikely anyone but you will notice the difference. That said, perhaps you are aiming higher than sufficiency, maybe you're reaching for something more, like adequacy.
To help you reach for those stars let's talk about a basic non-USB setup. There are four main pieces, and two cables to acquire to make this happen -- a device to record on, (like your laptop), headphones, a microphone, and likely something called an "interface". You've probably already got the first two, though I would urge you to look into slightly nicer headphones if you're coasting on earbuds[12].
To select a microphone for Foley, the main things to consider are "how do I reduce the noises I can hear in the room", and "how do I limit the amount of noise I can hear in the microphone itself". Electricity is surprisingly noisy, and there is no such thing as a dead silent microphone, you'll want to find one with a really low noise floor. The environment itself will help reduce the sounds that you can hear in the room but it's also helpful to find a microphone with a reasonably tight polar pattern, or the place your microphone is most sensitive ;).
You can see the polar pattern of your microphone by looking at accompanying spec sheets. There will usually be an attached a picture that looks like cells undergoing mitosis (or misshapen butts); this indicates the place around the end of the microphone that it is sensitive. Some let in a bit more of the sound around them in the room (cardioid, the heart shaped patterns), and some are much more narrowly focused forward (hyper-cardioid). For effects, a hyper-cardioid[13] seems to be the best bet, you hear fewer echoes in the room which you can get back in the game engine with attenuation.
Perhaps, as it has been hinted, you cannot plug your non-USB microphone directly into your computer. Many of them need power to run and while some have batteries the rest rely on phantom power which runs through the XLR microphone cable. You also generally want to set the volume of sounds before they hit your computer -- you can fix some ugliness in your DAW but it is always better to get a clear sound than try to bend a substandard one to your will, too much tweaking will make your recording sound very unnatural.
So, how do we get the sound from our microphone into our computer? We use that aforementioned interface. An interface is a little box that sits between your computer and microphone, providing power to the microphone and digitizes the audio before it gets to your computer. At work I was using an Apogee Duet which at the time was Mac only though apparently this has changed. It was alright, personally this was the piece of my setup I'd probably change first.
Though the Duet includes an adaptor that looks like the microphone should fit into it you will need to get an XLR or standard microphone cable, the microphone won't click into place in the adaptor and you'll feel like an idiot when you show your beau who knows something about this stuff and points out that connecting these is not going to work.
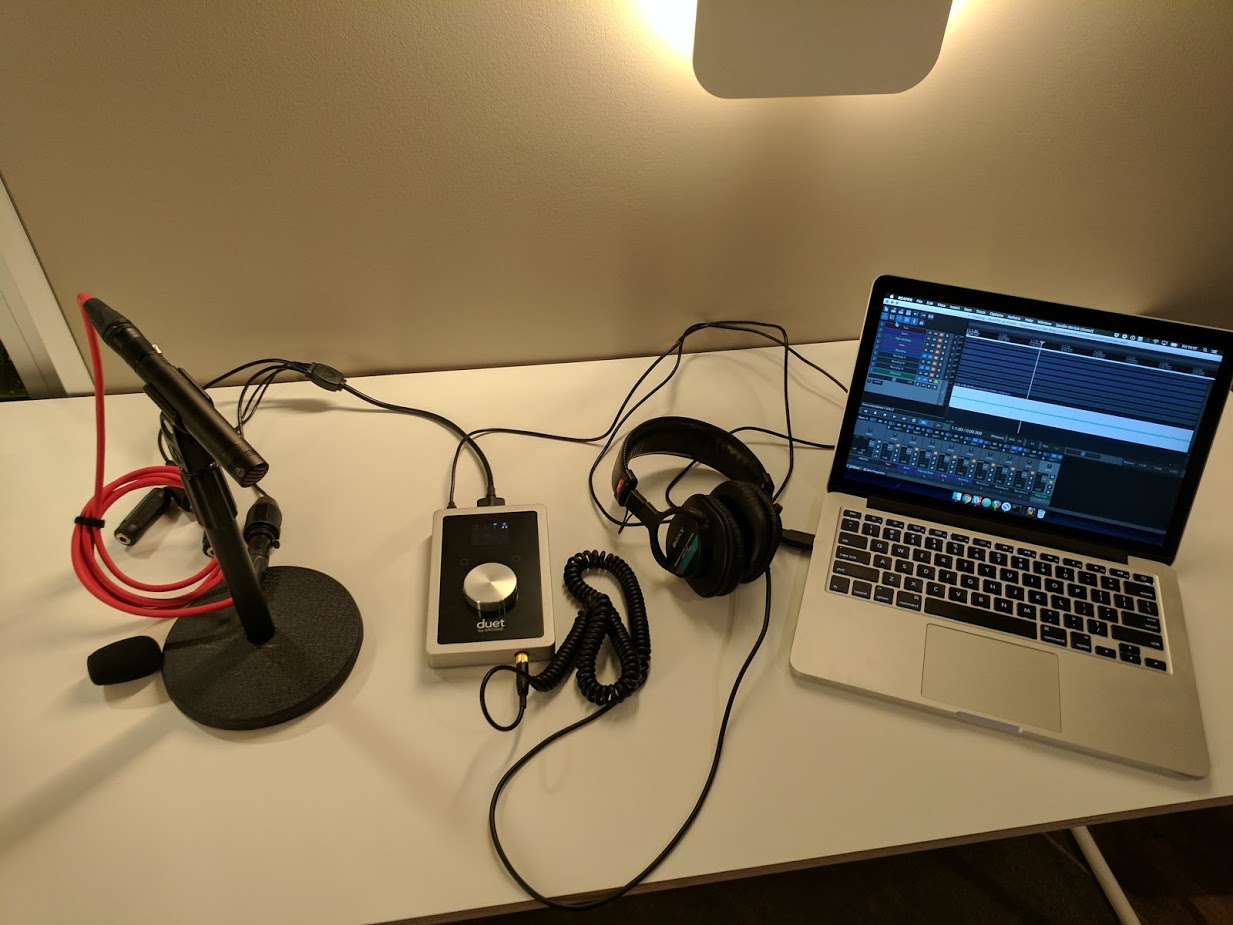
Here in the Expletive Deleted Underground Bunker Blog we are not known for beautiful photography, but I've included pictures to help illustrate how to connect all these things.
First you plug the end of the XLR cable into the microphone.
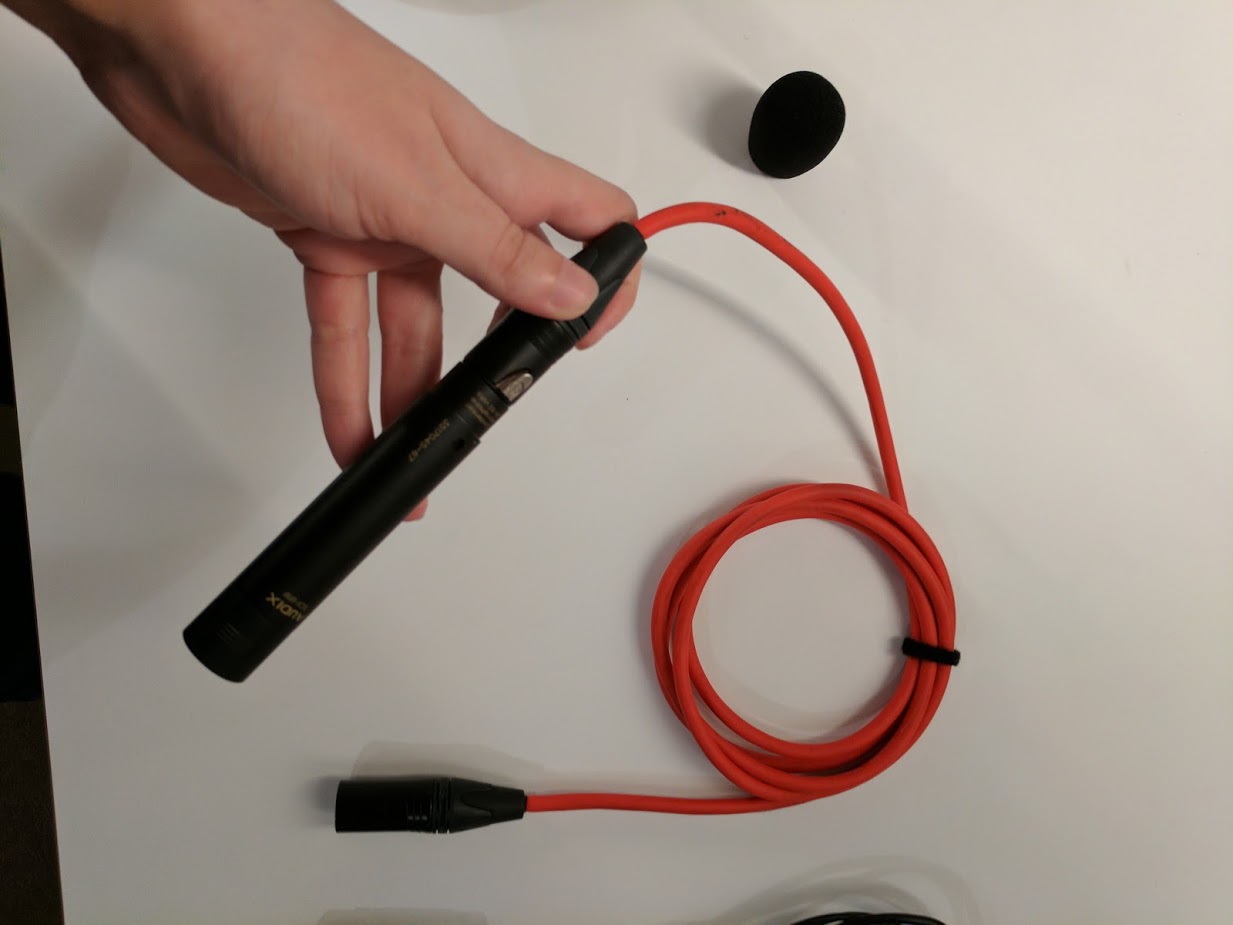
Next, plug the other end of the XLR cable either directly into the interface, or into a provided adaptor.
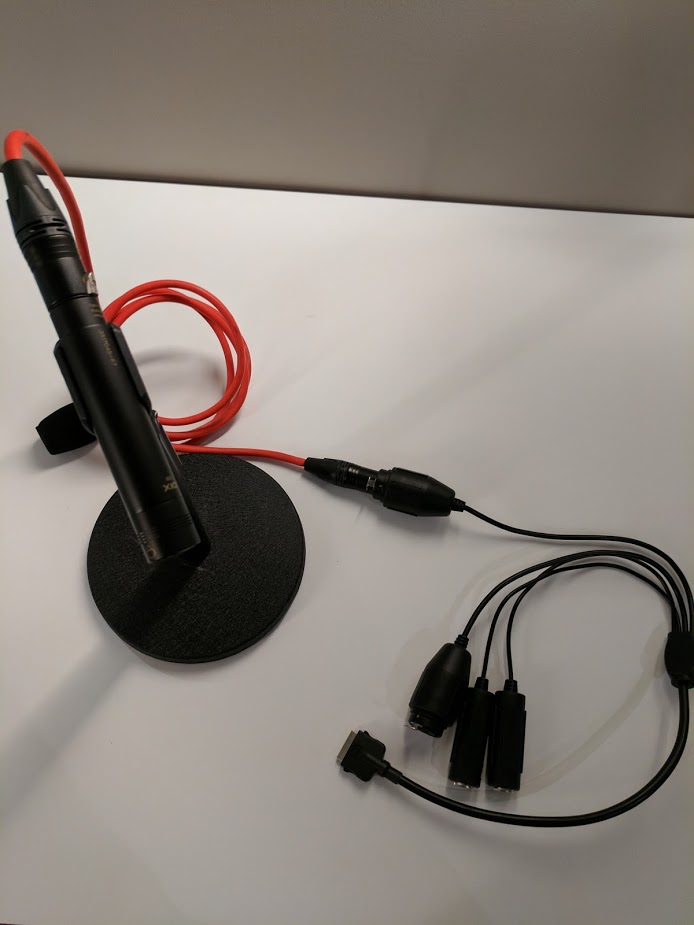
If you are using an adaptor plug that into the interface itself.
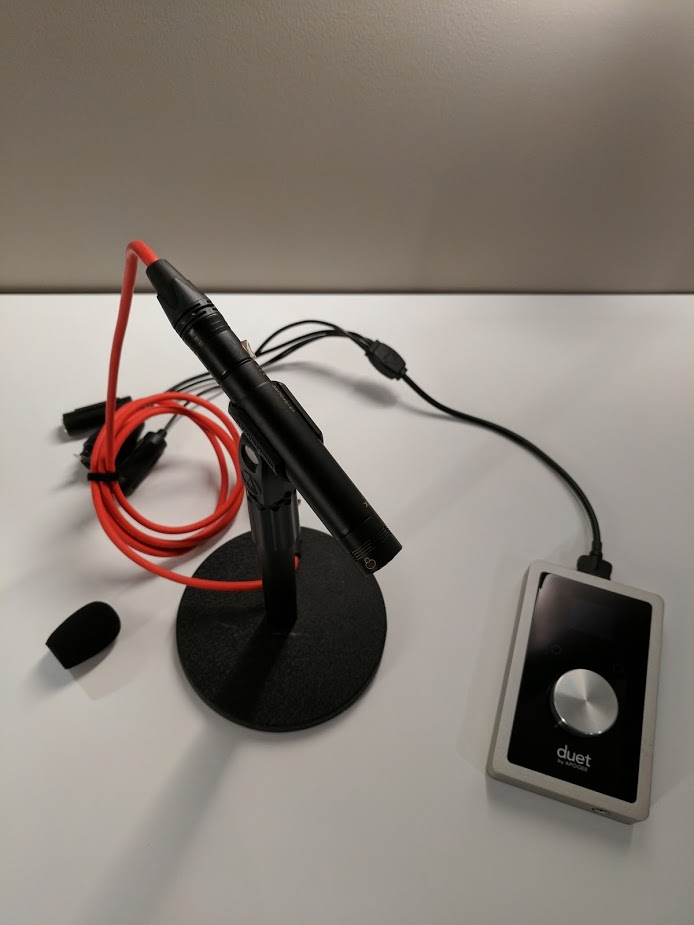
Finally, plug your headphones into the interface.
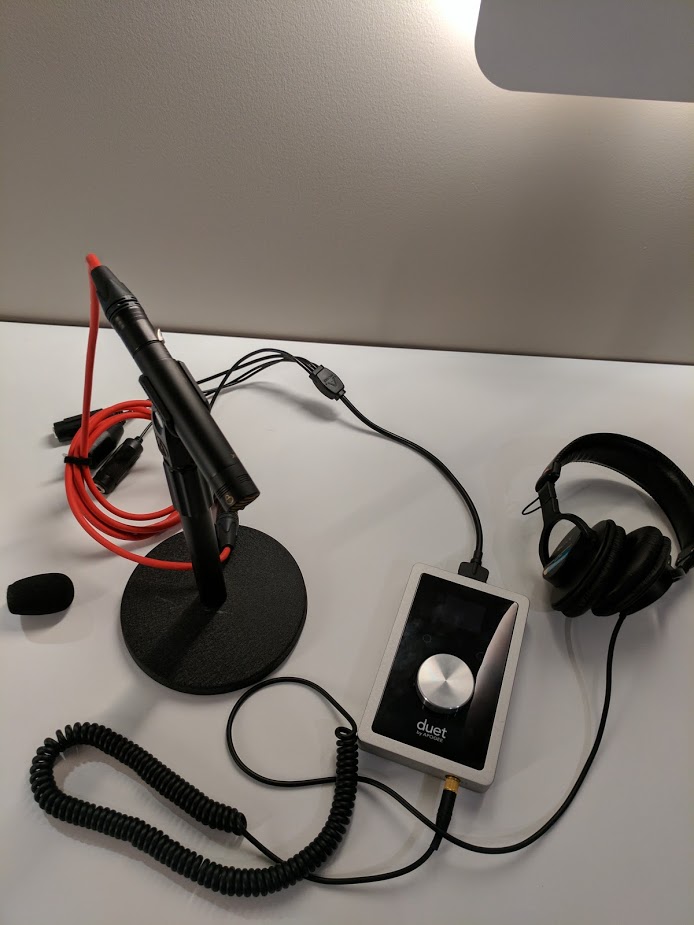
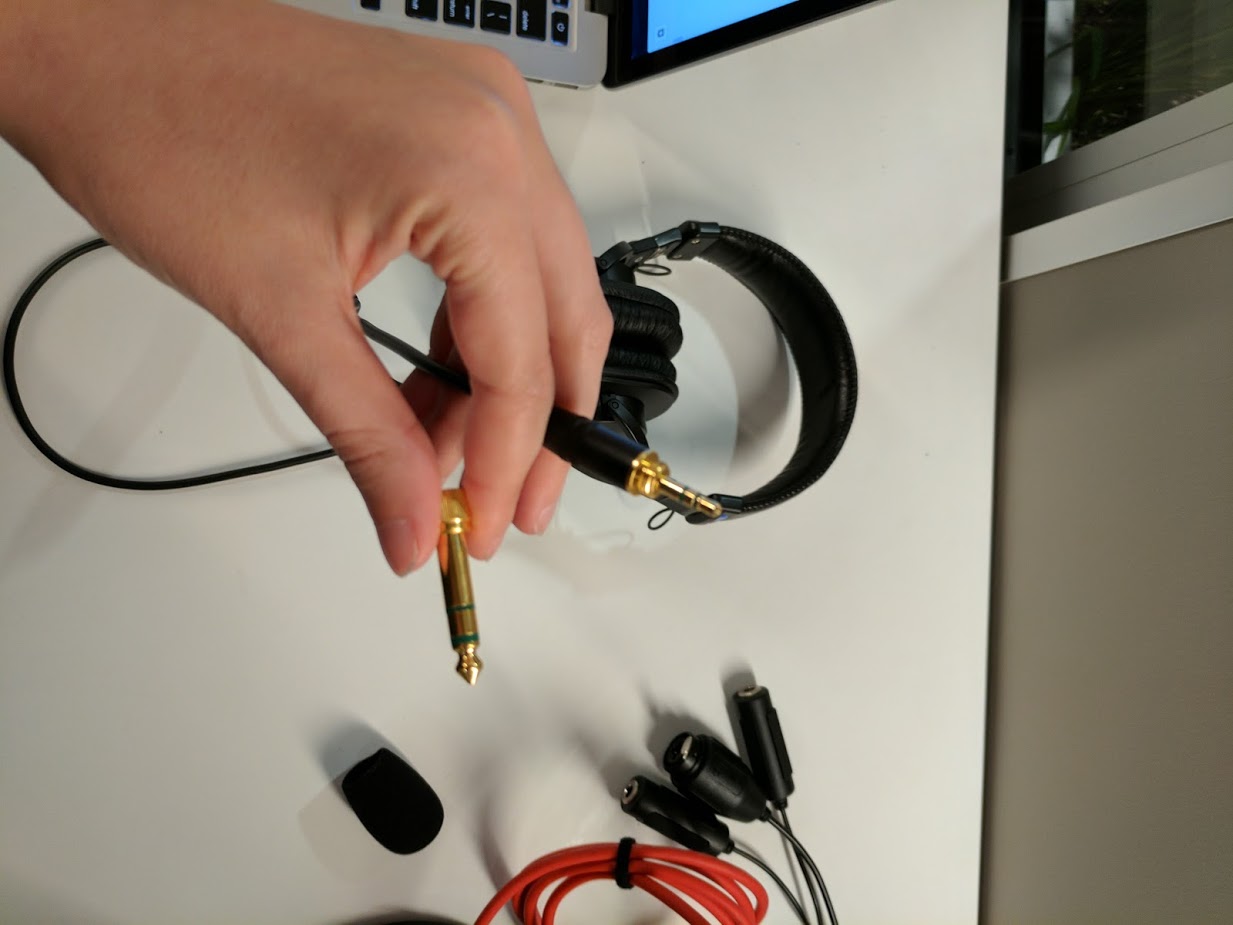
(Your headphones may not fit into the headphone jack on the interface -- if that is the case you'll need an adaptor to go from 1/16inch, or 1/8inch)
Plug your interface into your computer and you're all done!
Neat.
The bars should be moving on your interface now if there is a level metre directly on it which is the case with this Duet here. If there is a metre we can start setting the levels. Setting levels is the fine art of making sure you record sound as loudly as possible without introducing extra noise, distortion, or clipping. The first thing to do is to get the room you're recording in as quiet as possible, and set the volume of your audio input device as loud as you possibly can without seeing any movement or flickering on the bars, which indicates things are more or less silent coming into the device. Next make a few test sounds in front of the microphones generally around the volume of the thing you will want to record, if the test sounds cause the metre to spike into the red or yellow turn the volume down. Ideal levels will never cap the danger zone yellow, but any time you record anything nothing should ever be in the red, no matter how cool it looks.
With the sound volume coming into our machine being in an acceptable range we can now start recording them. Pop open REAPER, it's party time! When you open REAPER it will probably ask you what your audio input device is, in my case I just selected the Apogee Duet, but you should obviously pick whatever your interface is called. If REAPER doesn't ask you right away or you change your mind you can swap your device in the 'Preferences' menu.
You will record onto a track in REAPER, so create a new track and click the circle icon to 'arm' or set the track for recording. You can edit the levels here again as you should see a metre beside the track, loud enough that there isn't any flickering, but not so loud that your intended recording hits the red.
Down in the main panel you can click the circle button to record or the keyboard shortcut CTRL-R (Command-R on a Mac), make your noises and stop the recording, either by clicking stop or hitting the spacebar. Play it back, feel so good that you have gone from no fucking idea what all of these things are to fully recorded sound. Now you can go back up to the section and start mixing it, and up to the section above that and start sticking it into your game project.
Conclusion
Now, in this concise, 5000+ word package you should have the fundamentals needed to start homebrewing your own game audio projects. It might shock you to know, if you've made it this far into my dense prose there is a limit to how much detail I can go into in a single purpose guide, and I do hope to eventually write much shorter posts about more detailed topics, but this should be a good core to start with.
I have been sitting on this post for months, mostly because I'm still a very green sound person, and nervous that people who actually know what they are talking about will pound me into the dirt. So if you think something needs changing I'm happy to accept corrections, and suggestions -- just email me, or tweet at me. I consider blog posts living documents, I go back and edit years old posts that I'm reasonably sure no one else will ever read because it makes me happy.
Based on my experiences, sound is often a second class citizen when developing a game or VR project[14], but people would definitely notice if it wasn't there. If not I'd just set bad punk music as a backing track and call it all a day.
In the interest of full disclosure there I did spend a few days "working" at a foley studio in my home town when I was a surly teenager. I spent the sunny summer of my 16th year in reverent silence watching someone rumple clothes into a microphone. I did not appreciate how amazingly cool this was at the time nor how useful the learnings would have been if I had paid even the most cursory attention to what was going on. ↩︎
All punk music is bad punk music ↩︎
Along the way I'll use collision, physics, and impact sounds interchangeable here. ↩︎
PCM stands for Pulse-Code Modulation ↩︎
It might be a good topic for another blog post though ↩︎
Head-related Transfer Function -- basically using the position of your head to attenuate sounds ↩︎
Digital Audio Workstation; more details on this in a paragraph or so ↩︎
The first time I described what I was doing was mixing I nearly cringed myself inside out after years of associating the term 'mixing' with 'the biggest douche at the party'. I'm fine now, presumably because I don't tend to consider myself the biggest douche at the party. ↩︎
Surprisingly no, not build my own ↩︎
Actually, Brent is my uncle, Bob was my grandfather ↩︎
Picking the right headphones is a warren of infighting and strong opinions. I picked a pair of Sony headphones which seem to sit somewhere between loved and grudgingly accepted as usable. ↩︎
After fucking days of research I ended up with an Audix SCX1 for most of my recordings. ↩︎
Especially the Vive since they only just introduced attached headphones so you aren't juggling an HMD, headphones, and controllers while also trying to not strangle yourself to death on cables. ↩︎